Saturday, November 5, 2011

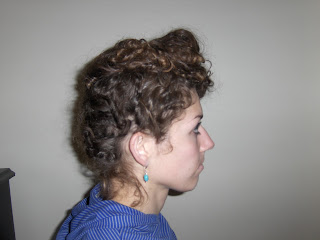
30 Days of HAIR!! Day 5!!!


This was another try at doing a braided crown.  I really liked it, except for the front...hahah.  It was a little too "slick" looking.  I am all about a little poof and there is no poof in this hairdo. 
To do this hairstyle I started in the center of the crown of my head and just started french braiding around and around and around until I ran out of hair.  Then I finished braiding that piece of hair and used a bobby pin to secure it where it would fall naturally if I was still french braiding.
P.s.  Try to take a picture of the back of your head.  Bahaha.  It took me a few tries to even get my head in the picture. 
ENJOY!

Friday, November 4, 2011

30 Days of HAIR!!! Day 4!!!

Do I make you feel awkward?  I make myself feel awkward...


Here is one that looks way better with straight hair, but I still didn't mind it.  For this one  you need a  longer length hair, but here is a tutorial for a shorter hair version too(she is so cute!).  The longer, the better.  Mine is just past my shoulders and I would have liked a bigger "bow", but was still pretty pleased.  Here is an awesome tutorial, it's in Japanese, but it's super easy to follow.  It looks cuter on her, too.  Something else to note is that I never use hairspray.  I hate how it makes my hair feel and I have always been paranoid that someone will touch my hair and think I am gross.  Hahah.  Weird.  ANYWAY.  This was a fun one.  Hope you enjoy it!

Thursday, November 3, 2011

30 Days of Hair!!! Day 3!!


If there's one thing I love it's a faux hawk.  Seriously.  I did a hairstyle a day and several of them were pretty similar because I just love it.  For this look I just took bobby pins and turned my head upside down.   I pinned all the hair to the middle of my head all the way up to the front where I just pinned until the hair was all secure.  Day #3!

Wednesday, November 2, 2011

30 Hairstyles in 30 days!! Day 2


One request for a hairstyle was a braided crown...I can't pull that off.  I know other people can, but it's too pretty for me(does that make sense).  SO, this is my version. 
I started at the top and did a french braid zig zag and then brought the end back up around to the side, securing with bobby pins. 
I hate bobby pins, so I use a lot of braids in my hairstyles.  I have an insane need to have my bobby pins too tight, which obviously gives me a headache, so I try not to use them very often. 
So there you have it.  Hairstyle #2.

Monday, October 31, 2011

30 Days of HAIR!!! Day 1

SO sorry for being unable to take a normal/nice looking picture of myself.  Haha.  Hairstyle #1


For this hairstyle I did a loose french twist with most of my hair ending up on top.  Then I swung it around to one side and joined it together with bobby pins.
I got an idea from another blog to do 30 days of hair.  I wanted to do hair styles that weren't things that people could easily think up on their own(like a side pony, straightening or curling hair or simple braid).  Here is a link to my pinterest board "hair".  I logged some of my inspirations there.  I will try my hardest to do one a day, but if I don't I'll make up for it in the next post.  I think I will also post my failures...some days just don't work out, BUT I promise to do AT LEAST 30 different hairstyles that I deem to be a success.  I am excited.  Lets get started!  Here are some things to note before we do:
-I can not take a normal or decent picture of myself or my hair
-Some hairstyles do NOT work with curly hair.  Or, they do, but you can't tell the insane amount of work that went into it.
-Hopefully you can see the details, but if enough people want me to I can get someone to take pictures for me.
-Having taken all the pictures myself, there are no tutorials, so if you want some clarification I can recreate the style on a day Art will be home and have him take some for me.
-Please excuse the no make up days.  I'm a mom and a crazy one at that.
-Enjoy!!!!!!

Scarf tutorial


I have a zillion shirts that don't fit me for some reason, either they are too short, too big, too small, etc.  You get the picture.  I keep hoping to fit back into them(the smaller ones anyway), but in reality it isn't going to happen.  SO I have used them for fabric flowers, bags, etc. and here is one more thing that I thought of:  Scarves!

Thursday, September 8, 2011

Just in time for Halloween! Fun Masks!

Here is an afternoon project that Hyrum and I did together.  It was fun, fast and easy.  My kind of project.  Here are some instructions and a link to an etsy account where I got the idea.  First I cut out the general shape we wanted.

I used old clothing, a sweatshirt, a piece of corduroy from an old pair of pants, and a piece from the fabric Hyrum's costume will be made out of.  I cut the main piece out of the sleeve(two layers) of the sweatshirt.

We used chalk to mark the circles we would cut out.

We put it all together to make sure we liked it.

Mark with chalk where the eye holes should go.  When putting it all together these marks should go on the back so that you can still see them and cut out the holes(this was one of the final steps).

Pinned the main piece together, sewed around the border.  Then I added the round corduroy pieces, pinned and sewed around the border.  Next I cut out the eye holes.  This was the hardest part by far.  In hindsight I should have used chalk again and traced some circles so that it would be easier to get everything symmetrical.  Then I sewed the edge of the eye holes.  Lastly I used my hot glue gun to secure the little beak.

Tada!!!  The final finished product.  I wanted it to be a little rough around the edges to give it a more "owl" look.  I can't wait for Hyrum to see it tomorrow!!  I think I might do these as a party favor for Hyrum's birthday party.  Fast, easy and pretty much free.  Perfect.
                             Here is the LINK to the etsy shop where I got the idea.  Enjoy!!!!