Saturday, February 9, 2013

I Spy Bag Tutorial


This is a project that was a long time in the making.  An I spy bag can be really boring or endlessly entertaining.  I spent a long time gathering small little trinkets that would fit inside and be fun to find for a toddler.  Although, I really liked how they came out, if I make them again I'll use small glass beads instead of rice.  The rice broke down a little bit after extended use and left a bit of a film on the plastic.  Other than that they turned out really fun.  You could do so many fun things with this, or fun themes.  You could do something for each letter of the alphabet, or a jungle theme, or fashion, the possibilities are endless!  Here is what I came up with:
The finished product
The hardest and most fun part is finding all of the fun things to go inside.  Get creative!  You could use game pieces or puzzle pieces that are from incomplete ones, Barbie or polly pocket accessories(lone shoes, etc), marbles, keys, cool buttons, paper clips, rocks, confetti, small plastic animals or dolls, etc, etc.
In this picture I had already sewn the plastic on, but I wanted to show the general size and shape you want.  I used an orange fleece I had leftover from another project and some clear vinyl.  I cut them both in a large rectangle, twice as long as what I wanted for the final bag(if you want to you can just use the vinyl in the windows, but I wanted mine to be heavy duty).  I wanted mine to be about 7 inches by 7 inches, so I just cut it about 7 inches tall and almost 15 inches wide.  I wanted the windows to be pretty big, so I cut them almost 4 inches, making sure that the two windows met when I folded the material in half.  A rotary blade and plaque come in really handy to make sure all of your lines are straight, but you can do it without them, too.
Next I pinned the vinyl and fleece together, pinning all around the window, but also a couple at the top, just to make sure everything kept straight.  I sewed pretty close to the edge of the window.  After sewing around both windows I folded the bag in half, matched up the edges, pinned it all together and sewed around the edges, starting with one of the top side corners and leaving about 3 inches unsewn so that I could put the rice and fun stuff in.  
I put all the trinkets in first and then added the rice afterward.  You won't want to fill it really full because it will make it hard to move the beads(or rice) and other items around and it will be harder to sew closed.  Once you have it just right, pin the rest and finish sewing it shut.

Have fun and get creative!


Monday, December 17, 2012

Stocking Stuffer Ideas

The most exciting and most cherished part of Christmas morning was opening our stockings.  We would wait in our beds, patiently, until our mother went to bed(usually sometime between 3-4 a.m.).  Then we would stealthily tip toe down the stairs and rush to our stockings, dump them out and gorge on sugar free candy and fruit(and didn't even regret it after our bowels exploded, later).  We would show our precious trinkets to each other and marvel at how lucky we were.  After we had re-stuffed our stockings(lacking the some goodies, and looking far less perfect), we would stuff our mom's stocking.  Our mother who was always doing for us, we got the special chance to pick out little special things meant just for her.  It was so exciting and the light of the Christmas tree and the warmth from our home made everything perfect.  We'd go back to bed until a reasonable hour(around 6) and get up again, start making pop-overs.  Then we would gather up our stockings, along with our mom's, march upstairs and show her what Santa had brought for us and for her.  It was always a magical morning for all of us and because of that, stockings are still my favorite part of Christmas.  Now I get to make that magic for my sweet husband and sweet boys.


Because I have such a love for them, I thought I would share some ideas for stocking stuffers for everyone on your list, so that it can be that magical for you, too.  I'm sure I could think of twice this many, but for one nap time a week before Christmas, here are my ideas(please forgive any duplicates or errors):

Men
-watch
-cuff links
-cologne
-tie
-tie clip or pin
-after shave
-shaving cream
-tools(hammer, measuring tape, etc)
-swiss army knife
-handkerchiefs(dressy or otherwise)


Women
-jewelry
-lipstick(or any other makeup, like eyeliner, mascara, blush, etc)
-perfume
-lotion
-hair products
-shaving cream
-bath salts and spa items(masks, soaps, etc)
-bobby pins and other hair items(elastics, clips, etc.)
-sewing, knitting, crocheting kit(or sewing items, thread, floss, scissors, etc.)
-craft kit(or small craft items, blank cards, pens, markers, etc.) 
-hand mirror or compact
-nail polish(or other nail items, stickers, etc.)
-sachet-makeup bag
-tights or leggings


Kids
-night light
-play dough
-flash cards
-silly putty
-finger paint
-finger puppets
-wood kits(build and paint a train, etc)
-shaped crayons or crayon puzzles(dino's, cars, etc)
-top
-musical instruments(egg shaker, maracas, clackers, kazoo, harmonica, triangle, etc, etc.)
-stickers
-slinky
-coloring book
-action figures/barbies/polly pockets
-littlest pet shop
-squinkies
-other small toys
-yo-yo
-car(matchbox, wind-up, etc.)
-jewelry making kit
-rattle
-kaleidoscope
-piggy bank
-kite
-puzzle
-sidewalk chalk
-fun band-aids
-dominoes
-swim goggles
-glow sticks
-mini magna doodle
-reading light
-plastic animals
-bubbles
-glow in the dark stars or animals
-mini tape measure(or other tools)
-lego sets
-hex bug
-stick on earrings
-doll clothes
-treasure box
-dress up clothes(masks, tutus, wand, crown, costumes, etc)
-play kitchen food or utensils
-jewelry kit
-bean bags or hacky sack
-small stuffed animal
-tooth fairy pillows
-gak/flarp
-water guns
-jump rope
-bath toys
-bibs
-goldfish(or animal crackers, etc, etc.)
-gyroscope
-teether
-baby rings
-pez dispensers
-silly bandz
-bubble bath
-webkinz
-headbands, bows, etc
-bow ties, ties, suspenders
-jacks
-balloons
-paper dolls
-kid safe scissors
-character dishes
-nerf gun or bullets


For Anyone
-fancy pen or pencils
-sd card
-chapstick
-candy
-pop rocks
-gum
-mints
-gift card
-nail clippers(or scissors, etc)
-address/date book
-camera memory card
-candles
-card games
-cell phone or accessories
-chocolates
-cookies
-DVDs
-iPod case
-jewelry
-kitchen items(specialties like egg slicer, garlic press, etc.)
-magazine subscription
-ornaments
-picture frame
-scarves and gloves
-snow globes
-socks/slippers
-stationery or note cards
-tickets to a concert, movie or sports event
-two-dollar bill
-bottle opener
-key chain
-wallet, money clip
-coasters
-temporary tattoos
-stencils
-toothpaste
-floss
-toothbrush
-hand warmers
-bike bell or horn
-chop sticks
-origami book or paper
-small calendar
-luggage tag
-fruit(apples, oranges, banana, etc) and specialty fruit(star fruit, pomegranate, etc.)
-comb
-brush
-shoe laces
-bookmark
-book
-stamps
-air freshener
-mug
-tire guage
-any sort of ball(golf, tennis, baseball, etc)
-pot pourri
-shoe laces(novelty)
-batteries
-coupons for some service(massage, chores, etc)
-underwear(racy, gag, character or regular)
-seeds
-fishing lures
-incense
-post-it notes
-water bottle
-weights(or other exercise stuff) 
-snow globe
-tripod
-straws
-calculator
-walkie-talkies
-magnets
-paper weight
-usb drive
-screen cloth
-ear buds/phones/etc
-magnetic poetry set
-rubix cube
-first aid kit
-cookie cutters
-gardening tools/gloves/seeds
-unusual buttons
-sketch book
-any art supplies(paint, paint brush, etc)
-flashlight
-binoculars
-compass
-belt
-tissue holder
-specialty foods(cheese, crackers, olive oils, teas, etc)
-cd
-mp3 player
-guitar strings(picks, tuner, etc)
-other specific instrument needs(drum sticks, reeds, etc, etc)
-hot chocolate or cider mixes
-jerky
-loofa
-cooking extracts(vanilla, almond, mint, orange, etc.)
-fishing lures
-pumice stones
-pedometer
-small kitchen scale
-lint roller
-kindle
-note from santa
-tire pressure guage
-nuts

-activity pads
-membership to local museums, etc
-whoopie cushion
-silly string
-vitamins
-magnifying glass
-whistle
-travel games
-chocolate oranges
-sunglasses
-hair products


Be creative!  You can make a lot of these on your own, if you are on a budget, and you can personalize a lot of them with monograms, etc.  Have fun!!

Merry Christmas!!!

Saturday, May 19, 2012

Repurposed Furniture for outdoors!

 We're doing quite a bit of renovating on our 1950's ranch here in Nebraska, which includes the curb appeal of the front porch. That's still a work in progress, but we Have already ripped up the "grass" indoor/outdoor carpet, repaired the concrete underneath and painted the porch floor with a nice non-slip taupe color that matches the brick mortar of the exterior.
 When I finished it looked very clean but very bare. I want to spend all of our renovation budget on more important indoor changes, so I looked around the storage building for something I could repurpose in case I should ever want to sit on the front porch and watch the world go by (yeah, right :) . Here's what I came up with:


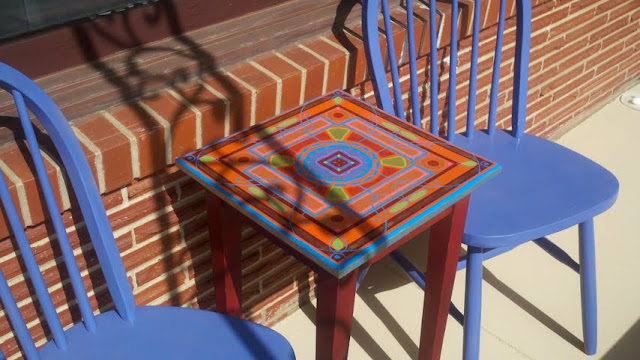
 These are two old pine chairs and an end table that we bought unfinished during our college years in Provo. They had a variety of dents and dings as well as loose legs, bolts etc. First I re-glued the legs and tightened the bolts, then, I sanded them down w/ medium grit sandpaper followed by smooth sandpaper and wiped them down. I left some of the dents because they add much needed character...

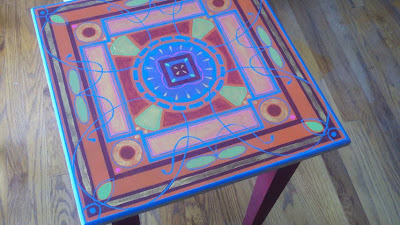
Next, was the fun part. Our house is all brick, and brown trim, brown, brown and more brown. We needed a big pop of color! I used a spray paint for the chairs that includes primer in Cornflower Blue. The table is a couple coats of barn red that I mixed myself w/ flat acrylic and then little bits of any other color that I felt like!

 All that is left is two coats of UV Satin finish varnish and we're good to go... and sit! Next up, the old bench which currently holds my flat of wheat grass. :D


Monday, January 9, 2012

Easy DIY Scrap Fabric Wreath

Yesterday I had a hankerin to make something. I chose a scrap fabric wreath and boy am I glad I did, it will be a perfect addition to Maile's sweet room. It didn't take too long and there was no sewing or needle work so I did it on the floor while playing with the girlies. Perfect.
1. Clip the hook off the top of a wire hanger and bend into a circular shape, it doesn’t
have to be perfect. I bent it with my hand first and then used my knee to get a
better shape. Wearing jeans helped.


2. Fabric Materials: *Rough estimates…do what you think looks good.
120 - 1” x 6 – 6.5” strips of desired fabric plus a few extra for filling in at the end.
140 - 2” x 6" tulle strips 10 extra for filling in when necessary.
*I used scrap fabric from past quilting projects…so I am not sure of the exact fabric yardage but I
would guess it is about a yard of regular fabric and a yard of tulle. (If you plan on a full tulle wreath I would have at least 2 yards on hand)
3. Tie all the tulle strips on with two knots. Don’t worry about placement, just yet.

4. Add them all in the same place, only because it is obnoxious to turn and turn and turn to get them in the right place. You are going to adjust them later anyway so why not all at the same time. :)

5. After the tulle has all been tied separate them into 3-5 strip clumps around the hanger.
6. Once you have separated
the tulle tie 5-6 strips of green in between each clump of tulle ties. Make
sure that as you tie the pattern is ending face forward.
*It was at this point that I realized my previous 9 inch strips were too long. 6 - 6.5 inches is the
perfect size to add volume without getting floppy. So I trimmed them ALL before adding more. You can do this later if you desire. Again, they don't have to be exact.
Finished green ties
7. Once the green strips are finished begin adding the pink alternating every other with the green but not with the tulle. The tulle should be clumped together to enhance it. (If you are making an all tulle wreath just remember to clump 3 or 4 strips of each color together)


8. After adding the last of the pink strips look for any empty spots and fill with more strips OR just roughly spread the strips around the hanger. If you look super close you may be able to see some hanger peeking out but it should not be noticeable from a foot away.
9. What it looks like after all the main strips are added and before any embelishments. If you think the length is too long, now is the time to carfully and evenly trim it down.
10. If you want you can add a few fabric accent pieces. Here I added a few brown with complimentary pink, white and green. I only had enough for 4 strips but I like the little pop it gives.
Up close of the brown accent fabric

11. Tie the ribbon to the top sides of the hanger. With the tie end toward the inside of the hanger.
The final product. It is going to hang on the wall above Maile's bed. So sweet!


Thursday, December 1, 2011

Chestnut Wreath tutorial


All you need to make this wreath is a wire hanger, a ribbon,
Lots of Chestnuts


Good thing there is a tree right in our back yard full of them(I don't hate it so much that so many of them fall everywhere, now)
And a drill
I drilled a hole in each of the chestnuts, bent the wire hanger into a double wreath shape with about 8 or 10 inches extra to hang(unnecessary), and strung the chestnuts on, secured the wire, tied a ribbon and that was it!  Enjoy!!


Wednesday, November 30, 2011

30 Days of HAIR!!!! Day 30!!!!


DAY 30!!!  I can't believe this is the last day.  Crazy.  Anyway.  This one is another complicated one.  I thought the last one should be.  I'll try to explain it as clearly as I can.  I started by parting my hair into 3 sections.  I put an elastic around each of the two sections on the outside, then did a french braid with the middle section going from the back to the front, using an elastic to secure in the front.  I then divided the side sections into 3 equal parts.  Here is where it gets tricky.  I started in the back with the bottom sections and french braided those sections toward the front, then crossed them, continuing with a regular braid until it could reach the opposite side to the second section on each side, then switched back to a french braid for the next section.  Then I repeated until all of the hair was braided.  So starting at the bottom there should be one braid down the middle of your head and one from each side, both making v's, crossing the middle twice.  Wow.  Does that sense?  PLEASE ask questions if it doesn't.  From this point with the hair completely braided I basically tangled the brades together and pulled them apart until there was a pleasant little pile in the front, then I secured it with bobby pins.  Ta-da!  Take that 30 days of Hair!  Enjoy!!!

Tuesday, November 29, 2011

30 Days of HAIR!!!! Day 29!!!

OH, hellooo.


Yes, I am wearing a robe...bahahah...I was cold...


Again these pictures were taken SO late at night, after wrestling with the boys, etc, so sorry about the extra frizz.  In the first hairstyle I had a hard time picking out the braids from the picture, so I recreated the look, which is the second style.  For both of them I started by my ears and did french braids, almost like pigtails, staying as close to the hairline as possible.  I then took the braids and wrapped them up into a circle...almost like a wreath.  Bahah....I'm so festive...   Anyway, I secured them with bobby pins.  With the first style I started more on the top of my head in the back and didn't braid all of the hair and kind of made a bun in the middle of the braid circle with the remaining hair.  Anyway, only one day left!!!  Yipes!!  So sad and happy it's almost over...Enjoy!!!